Continue reading to learn how to improve your retention and satisfy your clients with each application.

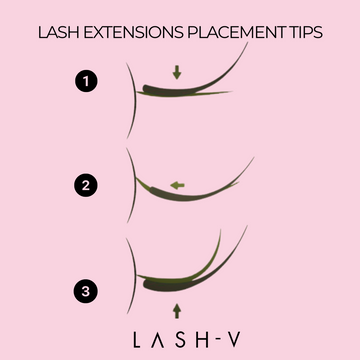
1. When the natural lash is growing straight or downwards use top attachment: The most common and popular method. Works especially well for the straight and downward natural lashes.

2. When the client doesn't have enough of a natural lash (or new lash growing) use side attachment:
The advantage of the side attachment method is that it makes the lashes fuller. This works especially well on the client with not enough natural lashes. However,Do notchoose this method if your client has curly natural lashes. It’s hard to get enough bonding surface from the side when the natural lashes have strong curls.

3. When the natural lash is curly or growing upwards use bottom attachment:
This is the second most popular attachment method after the top attachment. This works especially well on clients with upward-looking and curly natural lashes.

First rule: Attach lashes 0.5mm away from the skin along the lash line
Second rule: Make sure the base of the extension is fully attached
No matter what curl, length, the direction you use, it’s important to make sure the base of the lash extension is fully attached to the natural lash, at least 2mm. Your goal should be to ensure that the extension sits snugly against the natural lash, leaving 2-3 mm of attachment area. This approach significantly aids retention by providing ample support for the lashes.
Moreover, by achieving a flush placement, you reduce the likelihood of your client's lash brush catching on the base of the extensions and inadvertently pulling them off while brushing.
Can I attach a lash extension from the side?
There is no written rule in lash extension from which direction you must attach the extensions. It’s okay to attach from the side and bottom as well. Just make sure the base of the extension is parallel to the natural lash, and you have enough bonding surface.

